Achieving framework-independent zen with the power of interfaces and hexagonal architecture
Have you ever wondered what would happen if Spring was to suddenly pop out of existence? How easy would it be to migrate your web application to a different framework? Would it be possible at all?
Don’t worry, this is not one of those posts where I tell you that Spring is the root of all evil and you should try the fancy-new-alternative framework instead! What I do want to tell you, though, is that strong dependency on external components is dangerous and often hinders your project’s elasticity and capability to change - those two aspects are very close to AGILE and we don’t want to risk being called UNAGILE, don’t we?
“Easier said than done”, you might say, as web frameworks nowadays can be very intrusive. Contrary to libraries, they often enforce their structure, vision or conventions on us, making it necessary to adhere to those if we want to use the framework. Some of them introduce their own CLI tools to setup the aforementioned structure and conventions for you. Some others got so robust and compilcated they need a module to make it a sane experience to start working with them (looking at you, Spring Boot). Is it at all possible to isolate your logic and domain code in this situation?
My answer to that is - yes, it is possible - although not always easy. I’ll try to show you how to isolate the logic and domain code of your application into a no-dependency module that can then be turned into a web application using whatever framework you choose, integrating seemlessly with it’s dependency injection mechanism. Such isolated core can also be easily tested with the whole web layer completely missing. Sounds enticing?
Of course, the real world is not sunshine and rainbows and complexity tends to sneak in uninvited and often unnoticed. Being able to swap your domain logic from one framework to another without any issues is probably nigh impossible, but hexagonal architecture at least allows us to consider that as a realistic option, instead of a 2-year-long huge-risk endeavour that we use to scare our product owners with.
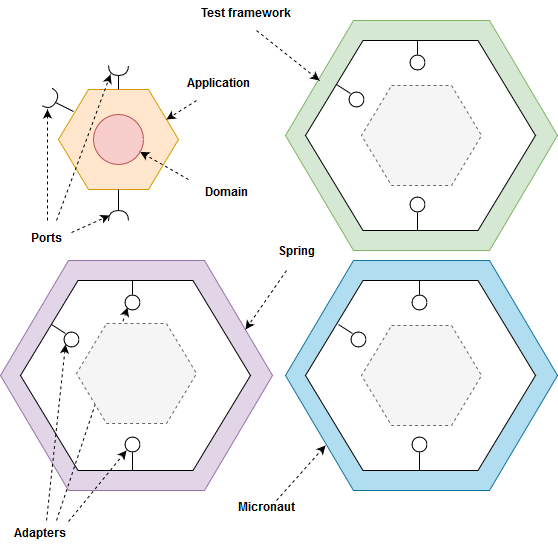
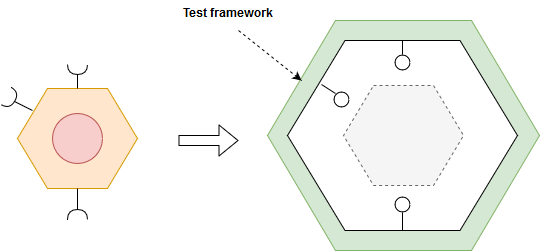
Here’s what we’ll try to achieve:
I will demonstrate the idea using Java and tools/frameworks from the Java ecosystem, but it’s really just a preference and the notion itself can be easily applied to other languages.
Know thy tools
There are a few concepts and tools being used to achieve our goal. We take a bit from DDD to isolate our domain, use the hexagonal approach to give our core application independence from the input provider (an HTTP server, in this case) and Java 9 modules to make it a bit more fun, but we could very well have done it with Java 8.
Hexagonal architecture
Hexagonal architecture is a huge topic, so I’ll only mention the few key aspects here. If you want to know more, Chris Fidao has created a great article about it - you can find it here.
Hexagonal architecture is about structuring our application in layers, where each layer sits on top of the previous one and introduces potential third-party dependencies it might need to fulfill it’s job - the important part here is that each layer only brings in what it really needs. In other words, the dependencies are moving in. For example, the domain logic of our application can do perfectly fine without knowing the notion of an “HTTP Request”, so our domain and application layers don’t need any web-related dependencies. But, once we arrive at a point where we want the domain logic to be triggerbale via HTTP, we need to introduce a dependency - in our case, that will happen in the framework layer.
“Why a hexagon”, you might ask. That’s just a visual way of showing that our application exposes Ports as a means of telling the higher layers how it should be used. Using the powerful notion of interfaces we achieve per-layer independence.
Let’s get dirty
The first thing we need to create is our core application - it will contain the domain and business logic, without any implementation-specific dependency or framework.
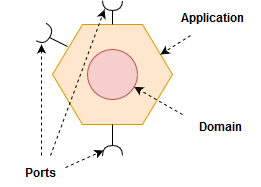
We’ll create a Maven project to hold two modules, each one representing a hexagonal layer: domain and application.
The domain layer will hold classes which represent the model of our application, while the application layer will hold some basic business logic that manages those classes.
(If we were to have a more advanced app, we’d probably want to have more and better specified layers. See the already-mentioned Chris Fidao’s post for more details.)
You can view the code for this part here: https://github.com/rskupnik/pet-clinic-modular
It’s a basic multimodule maven layout, nothing fancy. Make sure you reference your modules in your root-level pom.xml:
<modules>
    <module>com.github.rskupnik.petclinicmodular.domain</module>
    <module>com.github.rskupnik.petclinicmodular.application</module>
</modules>
Lair of the Domain
We will model a pet clinic, which has two domain objects - a Customer and a Pet. A Customer can have many Pets, and a particular Pet can only belong to one Customer. Basic one-to-many relationship. Our app will let us register a Customer with a list of Pets, list all the Customers and their Pets, list a single Customer and list all Pets. Again, just basic CRUD stuff.
Yes, it is a trivial app. That being said, it’s not really important what it does - we just need a concrete example to display the idea.
Our domain has a pom.xml with zero dependencies and the two classes, Customer and Pet:
public class Customer {

    private Long id;
    private String firstName, lastName;
    private List<Pet> pets;

    public Customer() {

    }

    public Customer(String firstName, String lastName, List<Pet> pets) {
        this.firstName = firstName;
        this.lastName = lastName;
        this.pets = pets;
    }

    // GETTERS & SETTER HERE
}
public class Pet {

    private Long id;
    private String name;
    private Customer owner;

    public Pet() {

    }

    public Pet(String name) {
        this.name = name;
    }

    // GETTERS & SETTER HERE
)
To avoid making this post unnecessarily long, from now on I’ll only show code samples for Customer-related classes, skipping the Pet ones. The full code can be found on github.
Since we want to use Java 9 modules for fun, there’s an additional module-info.java file, in which we define the domain module and expose the domain.customer and domain.pet packages.
module com.github.rskupnik.petclinicmodular.domain {
    exports com.github.rskupnik.petclinicmodular.domain.customer;
    exports com.github.rskupnik.petclinicmodular.domain.pet;
}
Application layer
This is the place where we implement business logic. It is also the place where we define our first interfaces as a means of telling the at-this-point-unknown higher layers about how this layer is meant to be used.
In our case, we define Repository and Service interfaces for both Pet and Customer. Those interfaces define what actions can be performed on those entities.
Important note: in a robust application, we might want to introduce CQRS and a fancy CommandBus at this point, but I’ve skipped that for simplicity’s sake.
Before we can make this layer work, we need to add a maven dependency on the layer below it - domain.
<dependency>
    <groupId>com.github.rskupnik.petclinicmodular</groupId>
    <artifactId>domain</artifactId>
    <version>1.0-SNAPSHOT</version>
    <scope>compile</scope>
</dependency>
Now let’s have a look at what we can do with the Customer.
public interface CustomerRepository {

    List<Customer> getAll();

    Customer get(Long id);

    void add(Customer customer);

    static CustomerRepository defaultRepository() {
        return new DefaultCustomerRepository();
    }
}
public interface CustomerService {

    Customer get(long id);

    List<Customer> getAll();

    void add(Customer customer);

    static CustomerService defaultService(CustomerRepository repository, PetService petService) {
        return new DefaultCustomerService(repository, petService);
    }
}
Everything here is pretty straightforward, except maybe the defaultX() static methods. What are these for?
From the point of view of the application layer, we define the CustomerService interface that tells whatever will be using it how it wishes to be used and what it allows for. Right, but where should we put the business logic then? My take on this is to introduce a DefaultCustomerService, put the business logic in there and make sure it’s easy for whoever is looking into satisifying the CustomerService dependency to know there is a default implementation available - hence the static constructor method in the interface.
Our default implementation uses a basic in-memory solution to store the data.
If you look into DefaultCustomerService’s code, you can see it has two dependencies:
public DefaultCustomerService(CustomerRepository customerRepository, PetService petService) {
    this.customerRepository = customerRepository;
    this.petService = petService;
}
How do we satisfy those dependencies? Well, that’s not a concern of this layer - this layer only needs to define the business logic that manipulates the domain objects. It can selflessly define the dependencies it needs and expect the higher layer to satisfy them, most probably using some sort of dependency injection mechanism.
Finally, the Java 9 module-info.java, which clearly expresses that we depend on the domain layer and export some stuff.
module com.github.rskupnik.petclinicmodular.service {
    requires com.github.rskupnik.petclinicmodular.domain;

    exports com.github.rskupnik.petclinicmodular.application.customer.service;
    exports com.github.rskupnik.petclinicmodular.application.customer.repository.api;
    exports com.github.rskupnik.petclinicmodular.application.pet.service;
}
That’s it, we now have a very basic application with no external dependencies. In the next step, we’ll try to apply Spring to it and turn it into a web app.
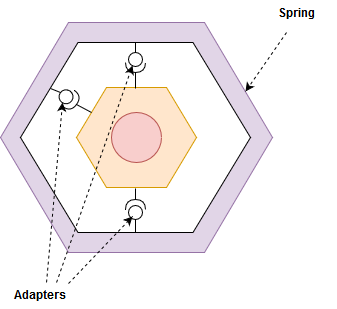
Springification
Let’s now try to put our core application inside Spring’s web framework so that it’s accessible with HTTP requests.
This part of the code can be viewed here: https://github.com/rskupnik/pet-clinic-modular-spring.
I’ve created a basic Spring Boot app using Spring Initializr with only the Web dependency.
Once we have the basic project skeleton, we add our core application as a dependency.
<dependency>
    <groupId>com.github.rskupnik.petclinicmodular</groupId>
    <artifactId>application</artifactId>
    <version>1.0-SNAPSHOT</version>
</dependency>
Then we introduce some DTO classes, here’s the CustomerDto example:
public class CustomerDto {

    private String firstName, lastName;
    private List<PetDto> pets;

    public CustomerDto() {

    }

    private CustomerDto(String firstName, String lastName, List<PetDto> pets) {
        this.firstName = firstName;
        this.lastName = lastName;
        this.pets = pets;
    }

    // GETTERS & SETTERS HERE

    public static CustomerDto fromDomain(Customer customer) {
        return new CustomerDto(customer.getFirstName(), customer.getLastName(), customer.getPets() != null
         ? customer.getPets().stream().map(PetDto::fromDomain).collect(Collectors.toList()) : null);
    }

    public Customer toDomain() {
        return new Customer(firstName, lastName, pets != null ? pets.stream()
        .map(PetDto::toDomain).collect(Collectors.toList()) : null);
    }
}
The static mapper functions should be moved to dedicated Mapper classes in a real application, but let’s keep it simple for now.
And a basic controller:
@RestController
@RequestMapping("/customers")
public class CustomerController {

    private final CustomerService customerService;

    @Autowired
    public CustomerController(CustomerService customerService) {
        this.customerService = customerService;
    }

    @RequestMapping(method = RequestMethod.GET, value = "/{id}", produces = "application/json")
    public CustomerDto get(@PathVariable Long id) {
        return CustomerDto.fromDomain(customerService.get(id));
    }

    @RequestMapping(method = RequestMethod.GET, produces = "application/json")
    public List<CustomerDto> getAll() {
        return customerService.getAll().stream().map(CustomerDto::fromDomain).collect(Collectors.toList());
    }

    @RequestMapping(method = RequestMethod.POST, consumes = "application/json")
    public void add(@RequestBody CustomerDto customer) {
        customerService.add(customer.toDomain());
    }
}
All fine and dandy, but remember that the application layer slefishly declared the dependencies, expecting the framework layer to satisfy them? We can use Spring’s dependency injection to achieve just that:
@Configuration
public class ImplementationConfig {

    @Bean
    public PetRepository petRepository() {
        return PetRepository.defaultRepository();
    }

    @Bean
    public PetService petService(PetRepository petRepository) {
        return PetService.defaultService(petRepository);
    }

    @Bean
    public CustomerRepository customerRepository() {
        return CustomerRepository.defaultRepository();
    }

    @Bean
    public CustomerService customerService(CustomerRepository customerRepository, PetService petService) {
        return CustomerService.defaultService(customerRepository, petService);
    }
}
There we go. Dependencies satisfied using the default implementations. All that remains is to add the DTO and controller for Pet, and our app is ready to work as a web app.
Switching In-Memory to Spring-Data
What if we wanted to save the domain data into an actual database instead of keeping it in-memory by using the default implementation?
We can add support for spring-data, but it’s not as straightforward. The main problem is that the Repository interface our application layer defined is incompatible with Spring’s convention of creating interfaces that extend the CrudRepository which Spring then takes and creates implementation for, generating conventional method names.
Luckily, there is a way to make incompatible interfaces talk to each other and it’s called the Adapter Design Pattern.
As such, without further ado - let’s create our adapter classes. By the way, you can view code for this section in the same repository (https://github.com/rskupnik/pet-clinic-modular-spring), just switch the branch to spring-data.
First of all, we need a Spring-Data-compliant interface to adapt to:
@Repository
public interface CustomerRepositoryJPA extends CrudRepository<Customer, Long> {
}
And the adapter itself:
@Repository
public class CustomerRepositoryAdapter implements CustomerRepository {

    private final CustomerRepositoryJPA repository;

    @Autowired
    public CustomerRepositoryAdapter(CustomerRepositoryJPA repository) {
        this.repository = repository;
    }

    @Override
    public List<Customer> getAll() {
        final List<Customer> output = new ArrayList<>();
        repository.findAll().forEach(output::add);
        return output;
    }

    @Override
    public Customer get(Long id) {
        return repository.findById(id).orElse(null);
    }

    @Override
    public void add(Customer customer) {
        repository.save(customer);
    }
}
Done. We can use our CustomerRepositoryAdapter as a CustomerRepository (interface introduced by application layer) and it will transparently route to the CustomerRepositoryJPA underneath.
We can now simply swap the bean implementation of the CustomerRepository interface in the config class:
@Bean
public CustomerRepository customerRepository(CustomerRepositoryJPA jpaRepo) {
    return new CustomerRepositoryAdapter(jpaRepo);
}
The application will work as it did before, except now it will use Spring-Data to save to an actual database.
Obviously, it’s not an ideal solution, as we lose the benefit of Spring’s auto-generated methods and need to write the basic logic ourselves in the adapter class.
–
Switching frameworks
Let’s test the elasticity of our solution by attempting to switch the web-tier framework from Spring to Micronaut.
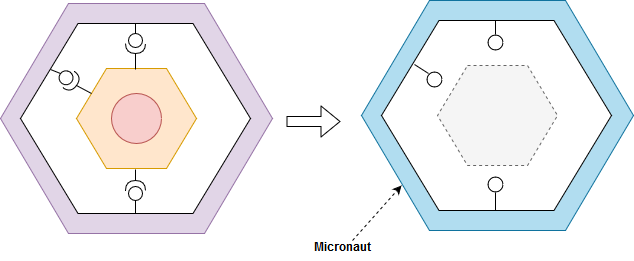
You can view the code for this part here: https://github.com/rskupnik/pet-clinic-modular-micronaut.
After generating a standard Micronaut project using their CLI tools, all we really need to do is add the dependency on our core application:
<dependency>
    <groupId>com.github.rskupnik.petclinicmodular</groupId>
    <artifactId>application</artifactId>
    <version>1.0-SNAPSHOT</version>
</dependency>
Then add the controllers:
@Controller("/customers")
public class CustomerController {

    private final CustomerService customerService;

    public CustomerController(CustomerService customerService) {
        this.customerService = customerService;
    }

    @Get(value = "/{id}", produces = MediaType.APPLICATION_JSON)
    public CustomerDto get(Long id) {
        return CustomerDto.fromDomain(customerService.get(id));
    }

    @Get(produces = MediaType.APPLICATION_JSON)
    public List<CustomerDto> getAll() {
        return customerService.getAll().stream()
                .map(CustomerDto::fromDomain).collect(Collectors.toList());
    }

    @Post(consumes = MediaType.APPLICATION_JSON)
    public void add(@Body CustomerDto customerDto) {
        customerService.add(customerDto.toDomain());
    }
}
The DTOs are the same as in Spring’s solution, no need to show them again.
The last thing we need is to plug in our implementations into Micronaut’s DI system, which in this case is done with a Factory class:
@Factory
public class CustomerBeanFactory {

    @Bean
    @Singleton
    public CustomerRepository customerRepository() {
        return CustomerRepository.defaultRepository();
    }

    @Bean
    @Singleton
    public CustomerService customerService(CustomerRepository repo, PetService petService) {
        return CustomerService.defaultService(repo, petService);
    }
}
Done. We can now launch the web application as a Micronaut app and observe the same effect as we did with Spring’s implementation.
Testing
This layered and isolated approach has a huge benefit of being easy to integration test without fighting the web framework in the process. Of course, testing the full application with the web layer included should still be conducted, but I’ll show you how we can create tests that check the core application’s logic without worrying about how it was triggered.
You can view the tests here: https://github.com/rskupnik/pet-clinic-modular
We’ll use Spock for testing, so let’s first add the necessary dependencies to our pom:
<dependency>
    <groupId>org.spockframework</groupId>
    <artifactId>spock-core</artifactId>
    <version>1.2-groovy-2.4</version>
    <scope>test</scope>
</dependency>
<dependency>
    <groupId>org.codehaus.groovy</groupId>
    <artifactId>groovy-all</artifactId>
    <version>2.4.15</version>
</dependency>

...

<plugin>
    <groupId>org.codehaus.gmavenplus</groupId>
    <artifactId>gmavenplus-plugin</artifactId>
    <version>1.6</version>
    <executions>
        <execution>
            <goals>
                <goal>compile</goal>
                <goal>compileTests</goal>
            </goals>
        </execution>
    </executions>
</plugin>
Now we can create tests that check the behaviour of our whole application (running on default implementations):
class ApplicationSpec extends Specification {

    def "should store and retrieve a customer with a list of pets"() {
        given:
        def app = createCustomerService()
        def customer = new Customer("John", "Smith", [new Pet("Barry")])

        when:
        app.add(customer)
        def retrievedCustomer = app.get(1L)

        then:
        retrievedCustomer != null
        retrievedCustomer.firstName == customer.firstName
        retrievedCustomer.lastName == customer.lastName
        retrievedCustomer.pets != null && !retrievedCustomer.pets.isEmpty()
        retrievedCustomer.pets.get(0).name == customer.pets.get(0).name
    }

    def createCustomerService() {
        return new DefaultCustomerService(new DefaultCustomerRepository(),
         new DefaultPetService(new DefaultPetRepository()))
    }
}
We have full control over how we initiate and trigger the core application as a whole. In this case, we just use the default implementations and trigger the add and then get API methods to conduct the tests. It’s obviously very simple, but demonstrates the point - once we have our isolated core under control, we can insert it into a testing frame of our creation to poke and test it however we need to.
Summary
Hexagonal architecture is a powerful concept when it comes to increasing encapsulation and cohesion and decreasing coupling of our codebase; and it’s based on stuff that’s been very well known for decades now: interfaces and abstraction layers. I honestly think interfaces are very underestimated, especially among the young practitioners - you only begin to appreciate them once you realise the power they give you - and that usually comes with experience.
Applying hexagonal architecture is difficult, as it requires discipline and careful code review for people who are not used to isolating the domain and tend to make everything public by default. It also definitely isn’t a silver bullet to be used everywhere and everytime, but is worth considering if you’re looking for maintainability, decreasing dependency burden on your frameworks and overall readability not only of your codebase, but also the domain. There is some overhead introduced - and potential integration issues are possible - so if you’re just looking to hack away at your pet project and are ok with sacrificing maintainability and elasticity, while also not planning to switch any major frameworks and libraries then you’re probably better off without these ideas (but I would still use interfaces to isolate from third-party).