Adding fingerprint verification to KeePass
Youtube version of this video: https://www.youtube.com/watch?v=NcYSvI1M3UI
The idea
- Modify KeePass’s code to make an HTTP call to my local raspberry pi device whenever a password is requested
- Based on the response, either provide the password or deny it
- Launch a simple HTTP server on my local raspberry pi device to handle the requests
- Plug in a fingerprint device to the raspberry pi (over UART)
- Make the HTTP server running on the raspberry pi communicate with the fingerprint device and respond appropriately

Necessary disclaimer
This is only a pet project made mostly for fun, it is not meant to be relied on in terms of security. The data is transfered without encryption and the whole thing can be easily ommited by a fake server intercepting requests.
That being said, this is only an additional layer of security added to KeePass, so it is at least as secure as regular KeePass is.
Hardware
In order to get this done I’ve used the following:
- A Raspberry Pi 3
- A Waveshare fingerprint scanning device with a UART module
- Some female-female jumper cables to connect the Pi to the fingerprint scanner
Software
There are two rather simple pieces of code needed for this:
- An HTTP server installed on the Raspberry Pi to make it possible for computers in the network to talk to the fingerprint scanner device (Python, but can be any language you can write an HTTP server in)
- A small piece of code inserted into KeePass’s codebase to ask the Raspberry Pi to verify the fingerprint whenever someone requests a password (C#, since that’s the codebase)
Implementation
Here’s the whole thing broken down into tasks:
- Connect the fingerprint scanner to Raspberry Pi and configure the latter
- Modify KeePass’s code to send a request to our Raspberry Pi’s address whenever a password is requested
- Write an HTTP server to handle the requests and communicate with the fingerprint scanner via UART
Connect the fingerprint scanner
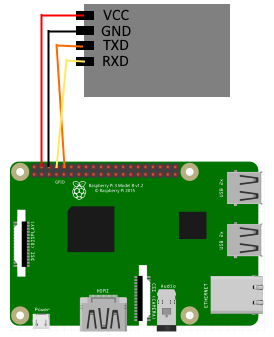
Using the four female-female jumper cables, connect the 5v, GND, TX and RX pins to Raspberry Pi. Remember to connect the TX of the device to RX of the Raspberry Pi and the other way around.
Unfortunately, Raspberry Pi 3 requires some configuration tweaks to enable the proper UART device for arbitrary use. By default, the UART device is reserved for Bluetooth and the TX and RX pins route to the so-called mini-UART. The problem with this is that the mini-UART has a CPU-dependent baud rate and is known for causing communication issues with the connected devices. Since we don’t need bluetooth, we can disable it and modify Raspberry Pi to route the TX and RX pins to the proper UART device instead.
More details about this can be found here. What I ended up doing was two things:
- Add a
dtoverlay=pi3-disable-btentry toconfig.txtfile to disable Bluetooth and restorettyAMA0to GPIO pins 14 and 15 - Disable the system service that initializes the modem:
sudo systemctl disable hciuart
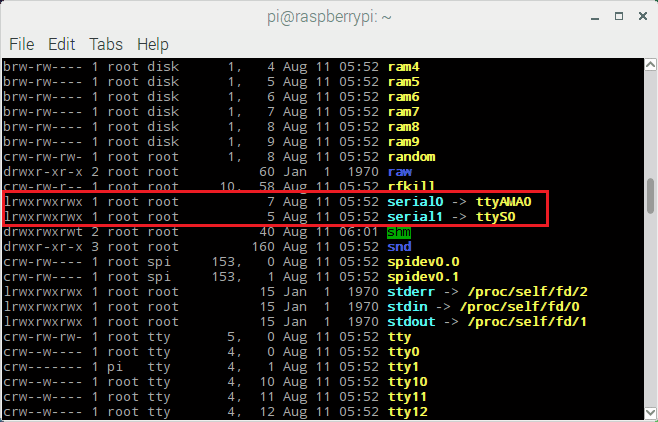
After a restart we should have everything read to go. We can check that by running ls -l /dev and inspecting the serial0 entry - if it points to ttyAMA0, it means GPIO pins 14 and 15 are connected to the UART interface we want.
Writing an HTTP server
I’ve found it easier to do in Python, but it can be done in any language and technology you can create an HTTP server in and access serial.
The server will handle two requests at the root url:
- GET will trigger the fingerprint scanner into check-fingerprint mode, wait for the user to put his finger against the scanner and interpret the response from the device - the server will return a 200 OK or a 413 FORBIDDEN based on the response from the scanner
- POST will trigger the fingerprint scanner into an add-fingerprint mode, which will grab the user’s fingerprint and register it. It is intended to only be used once at the beginning to register your fingerprint.
Before we can do all this, we need to know how to communicate with the fingerprint scanner over UART - and for that, we need the manual:
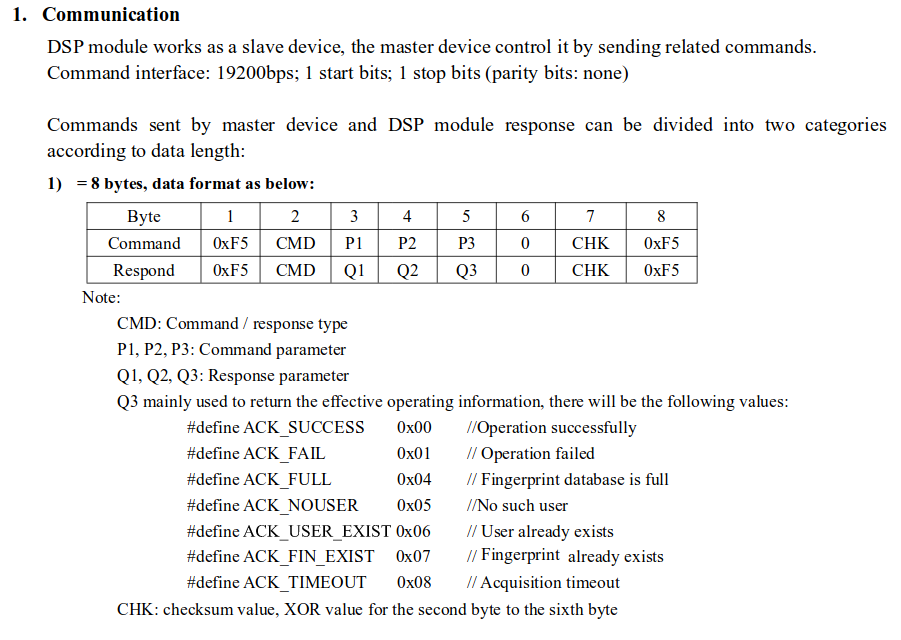
From the image above we get the following info:
- We need to use 19200 baud rate
- Communication is done in 8-byte packets
- We directly control only 4 from those 4 bytes, the rest is either static or derived (my code needs 5 bytes specified, but one is always 0 - oops)
- In the response, we mainly need to check the 5th byte -
0x00indicates success - We need to do some xoring for the checksum, which is weird since the xor value seems to always be 0 - but it works so whatevs :)
Sending and receiving bytes over UART
Here’s a piece of code to handle sending and receiving data to and from the device. Note that we need to take endianness into consideration.
import serial

ser = serial.Serial("/dev/serial0", baudrate=19200, timeout = 5)

def send_bytes(bytes):
    tosend = [0xF5] + bytes + [bytes[0]^bytes[4], 0xF5]
    ser.write(tosend[::-1])	# reverse the order cause endianness

def receive_bytes():
    return bytearray(ser.read(8))

def verify_success(bytes):
    return len(bytes) == 8 and bytes[4] == 0x00
Adding a fingerprint
According to the manual, adding a new fingerprint to be later used for verification is done with 3 packets:
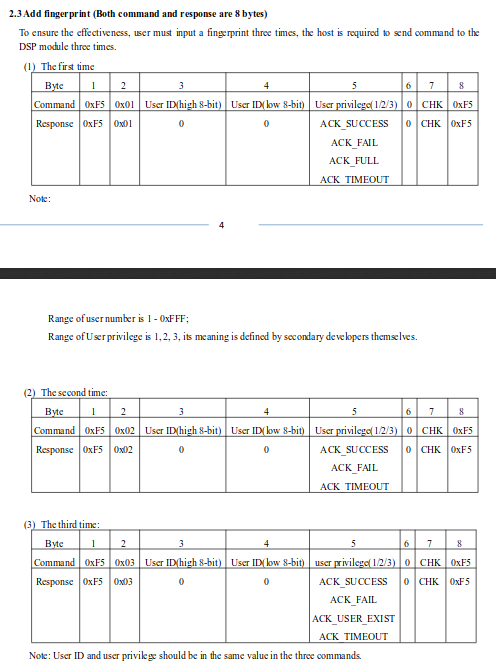
In code, it looks like this:
def add_fingerprint():
    send_bytes([ 0x01, 0x00, 0x01, 0x01, 0x00 ])
    bytes = receive_bytes()
    if not verify_success(bytes):
        return False

    send_bytes([ 0x02, 0x00, 0x01, 0x01, 0x00 ])
    bytes = receive_bytes()
    if not verify_success(bytes):
        return False

    send_bytes([ 0x03, 0x00, 0x01, 0x01, 0x00 ])
    bytes = receive_bytes()
    if not verify_success(bytes):
        return False

    return True
Note that the user ID is hardcoded to 1 - this will be enough for the POC, but the device is capable of handling multiple users. The POC can be easily extended to handle this as well.
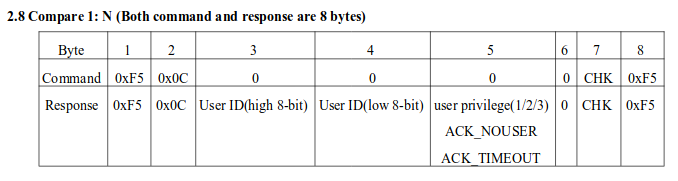
Authenticating a fingerprint
This is where we activate the scanner and expect the user to press his finger against it - and then verify whether the fingerprint matches the one that was added using the code above.
def auth_fingerprint():
    send_bytes([ 0x0C, 0x00, 0x00, 0x00, 0x00 ])
    bytes = receive_bytes()  # blocks until user presses finger
    return len(bytes) == 8 and bytes[4] == 0x01  # privilege 1 was used to add the fingerprint
Running the HTTP server
This part is about launching the server and serving the GET and POST requests using the pieces of code outlined above.
class S(BaseHTTPRequestHandler):
    def _set_headers(self):
        self.send_response(200)
        self.send_header('Content-type', 'text/html')
        self.end_headers()

    def do_GET(self):
        result = auth_fingerprint()
        if result:
            self.send_response(200)
        else:
            self.send_response(403)
        self.send_header('Content-type', 'text/plain')
        self.end_headers()


    def do_HEAD(self):
        self._set_headers()


    def do_POST(self):
        self._set_headers()
        result = add_fingerprint()
        self.wfile.write("<html><body><h1>Fingerprint added: "+str(result)+"</h1></body></html>")

def run(server_class=HTTPServer, handler_class=S, port=80):
    server_address = ('', port)
    httpd = server_class(server_address, handler_class)
    print 'Server started'
    httpd.serve_forever()
Entire code
That’s all we need from the Python code to communicate with the device and serve HTTP requests. You can find everything put together here: https://gist.github.com/rskupnik/0b7929d7548b0fa201c427fd35778717
Modify KeePass’s code to ask for fingerprint verification
This part was actually the easiest. I used an unofficial github mirror as it was easy to work with. After importing the project I spent a bit of time debugging to figure out which part of the code needs to be changed - once I got that, all there is left is to add the code. Here’s an entirely new private method that makes the request and interprets the response:
private bool IsAllowedToCopyPassword()
{
    SetStatusEx("Fingerprint verification...");

    HttpWebResponse response = null;
    try
    {
        HttpWebRequest request = (HttpWebRequest)HttpWebRequest
        			.Create("http://raspberrypi.fritz.box");
        request.Method = "GET";

        response = (HttpWebResponse)request.GetResponse();
    } catch (WebException e)
    {
        if (e.Status == WebExceptionStatus.ProtocolError)
        {
            response = (HttpWebResponse)e.Response;
            Console.Write("Errorcode: {0}", (int)response.StatusCode);
        }
        else
        {
            Console.Write("Error: {0}", e.Status);
        }
        SetStatusEx("Fingerprint verification FAILED, denied access to password");
        return false;
    }

    return response != null && response.StatusCode == HttpStatusCode.OK;
}
And here’s a modified existing method that makes use of the new one:
private void OnEntryCopyPassword(object sender, EventArgs e)
{
    if (!IsAllowedToCopyPassword()) return;	// The only added line

    PwEntry pe = GetSelectedEntry(false);
    Debug.Assert(pe != null); if(pe == null) return;

    if(EntryUtil.ExpireTanEntryIfOption(pe, m_docMgr.ActiveDatabase))
    {
        RefreshEntriesList();
        UpdateUIState(false); // Modified flag set by expiry method
    }

    if(ClipboardUtil.CopyAndMinimize(pe.Strings.GetSafe(PwDefs.PasswordField),
        true, this, pe, m_docMgr.SafeFindContainerOf(pe)))
        StartClipboardCountdown();
}
Here’s a github commit version of the above change: https://github.com/rskupnik/KeePass2.x/commit/4e6962b25e5461c55fe12629ab7ce04a024918af
That’s all folks!
To get this thing started we just need to run the python code on our Raspberry Pi, make sure the address of the Pi used in the C# code is alright - then simply build the KeePass project, run it and there you go - you can see the outcome at the top of this page or here: https://www.youtube.com/watch?v=NcYSvI1M3UI