Lost in LibGDX's UI tools? - maybe this'll help

That’s how I felt when I tried to make sense of how to properly create a UI in LibGDX. The reason for that confusion is that there’s a compilation of a few libraries and concepts that create a powerful stack, but you first have to understand the place and use for each of the pieces of that stack - and it’s not properly explained in the documentation how they fit together.
I’m not saying LibGDX’s documentation is bad - it’s actually better than most I’ve seen. Unfortunately, the docs tell you how to use each particular piece of technology, but they don’t tell you how to combine them and how they come together. That’s why I created this post.
The goal is to show you the tools you have at your disposal when it comes to UI in LibGDX and what their place is in the whole stack.
I won’t provide details on the particular tools but I’ll try to provide links where appropriate, so that once you know how everything fits together, you can read how to use this stuff to actually get shit done :) Some details and/or tutorials will probably come in future blog posts.
Scene2D and Scene2D.UI
Those two are the basis of LibGDX’s UI.
Scene2D is a 2D scene graph that allows you to layout your actors in a hierarchy and manipulate them as groups.
Imagine a dialog panel with some information and an ‘OK’ button. When you think about it, both the text on the panel and the button are children of the panel - when you move the panel, the text and the button should move along. The text and the button only exist in the scope of the panel, they do not know, nor do they need to know, the world beyond it. The button itself consists of a clickable part and the ‘OK’ label.
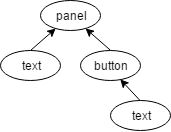 Poor button, he’s never seen the world beyond the panel.
That’s how a very basic graph looks like. Your whole UI can be expressed in this form, although much more robust. Every element (actor) of your UI belongs to another element and exists only in the scope of his parent.
What is important to understand is that Scene2D operates on abstractions. All those Actors you define are only abstract entities that have no graphical form (more on this later). You can think of it as the Scene2D being a backend and Scene2D.UI being the frontend.
Scene2D’s most important classes are: Stage, Actor and Group. You build your UI by assigning Actors to other Actors, Groups or the Stage directly.
Scene2D.UI is a package that provides common UI widgets and classes built on top of Scene2D.
In Scene2D, you only have the Stage, a general Actor class and a Group class. If you wanted to create buttons, tables, labels or, you know, the actual UI, you’d need to create classes for all of these that extend Actor and implement everything that’s necessary.
That’s what Scene2D.UI is for - someone’s already done that for you and you have at your disposal a package with common widgets (buttons, labels, lists, etc.) to use.
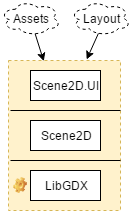
Using Scene2D.UI (and Scene2D underneath) there are two things you need to provide:
- Layout, to define how your UI is structured, which actor belongs to which and what is their position
- Assets, to provide an actual graphical form to your actors
Here’s how it all fits together:
Alright then, what we’re still missing is how to provide assets and layout information, so let’s talk about this now.
Skin
Skin is the answer to the question “how do I provide assets so that my Scene2D.UI Actors gain an actual, graphical form?”.
You feed the Skin resources and pass it to Scene2D.UI which knows how to apply them to your Actors. Simple as that.
There are a few ways you can populate your Skin:
- Programatically - simply define objects in code and add them to your Skin
- Using a texture atlas created with a texture packer. Texture packing is a useful and important technique and there’s a great tool for it: Texture Packer GUI
- Via a JSON file - JSON is a human-readable format you can use to easily define your assets. The advantage here is that simply looking at your JSON file you can quickly get to know what assets you have at your disposal and how they are named.
Important note: you can mix these methods. For example, in my latest project, The Story, I’ve used all three of those:
- I use BitmapFontGenerator to generate BitmapFonts from TTF files and insert them programatically from the code
- I use a texture atlas with all my other UI assets to load them at one go as a single, optimized texture
- I use a JSON file to define styles for the assets loaded from texture atlas
If you’d like to start creating your UI but you don’t have any assets to build a Skin, there’s a repository you can use to choose a skin of your liking.
You can also get a lot of great assets for free or below $10 from the great Kenney.
Layout
Currently, the only option in raw LibGDX to define how your UI is structured is to do that in code. For details, you’ll most likely want to read on the Table Widget. This widget is a port of a known Java library for structuring UI layouts as logical tables called TableLayout.
You create structure by attaching Actors either directly to the Stage or to other Actors/Groups. In the most common scenario you would have what is called a root Table that spans the whole screen and you add Actors to that table.
Although I won’t get into details, as this is supposed to be an overview, there’s one thing that helped me understand how Scene2D works and which might help you too: Actors are positioned and sized by their parent Table or Group, not by themselves.
There is a powerful third-party option available to bring your structure definition outside your code and it’s called LML. LML stands for LibGDX Markup Language and allows you to define the structure of your UI using a HTML-like syntax. Here’s an official tutorial if you want to know the details.
Just to boost your appetite, here’s how an example dialog window would be defined in LML:
<window title="@firstTitle" onecolumn="true">
    @helloWorld
    <textbutton onclick="roll">@randomPrompt</textbutton>
    <label id="random"/>
</window>
And the output would be this:
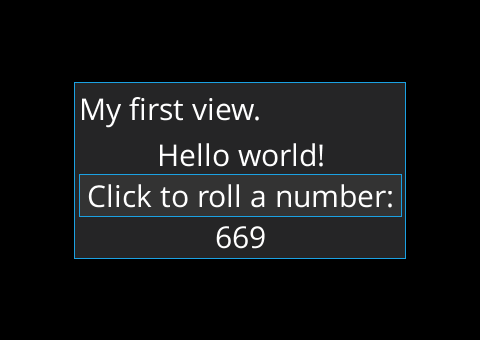 Not overly impressive, I’ll agree on that
It’s quite powerful, considering you can separate your view from your model, use i18n seamlessly, build your own macros and inter-operate with Java code underneath.
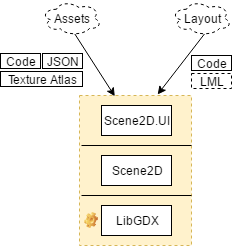
Alright, we might just have a full picture now:
Summary
The basic engine for structuring UI in LibGDX is Scene2D, which is a scene graph. It allows us to use a Stage and define Actors and Groups, but it only operates on abstracts.
To save yourself from defining common widgets, such as Buttons, Labels and such, you can use Scene2D.UI, which is a bundle of common widgets for you to use. One of those is Table, which is a port of a known Java UI library, TableLayout.
To build a UI with Scene2D.UI and Scene2D, you need to provide structure (layout) and assets.
Structure, in raw LibGDX, is defined in code by assigning actors to other actors or the Stage directly. You can also use third-party libraries, such as LML.
Assets are provided via the Skin class. The Skin can be populated programatically, from a texture atlas or via a JSON file.
Links
Texture Packer GUI - a great tool for packing your assets into a single texture, which will optimize your GPU-calls greatly. It’s actually built with LML.